Jam Cocktails

jam cocktails recipe

Jam Cocktails recipe
serves 1

This is more of a formula that a specific recipe, but it’s something I’ve been having fun with this past week. Jams and preserves are perfect bases for cocktails because they combine both sweetness and acidity—the two main elements you are often looking to add to a spirit to make a cocktail. Plus they often combine a few flavors and have a cooked down consistency that provides robustness and a little texture. Here’s the base formula I use and then how I modify it for specific flavors. Note that some jams are sweeter or more sour than others, so you’ll want to adjust the lemon juice accordingly (and potentially add a little extra honey or sugar.) Don’t know how to measure an ounce? 1 ounce is 2 tablespoons.

2 tablespoons jam
2 ounces spirit of choice (vodka, gin, whiskey, rum, etc)
1 ounce lemon juice
club soda and optional garnishes

  1. Combine jam, alcohol, and lemon juice in a shaker in a cocktail shaker with ice and shake well to combine. You’ll want to shake extra hard to break up the jam.

  2. Pour into a cocktail glass. You can strain to get out any jam bits, or leave them in if you like the texture. Top with additional ice, a splash of club soda and any garnishes like berries, herbs, or citrus zest.

Some specific recipes:

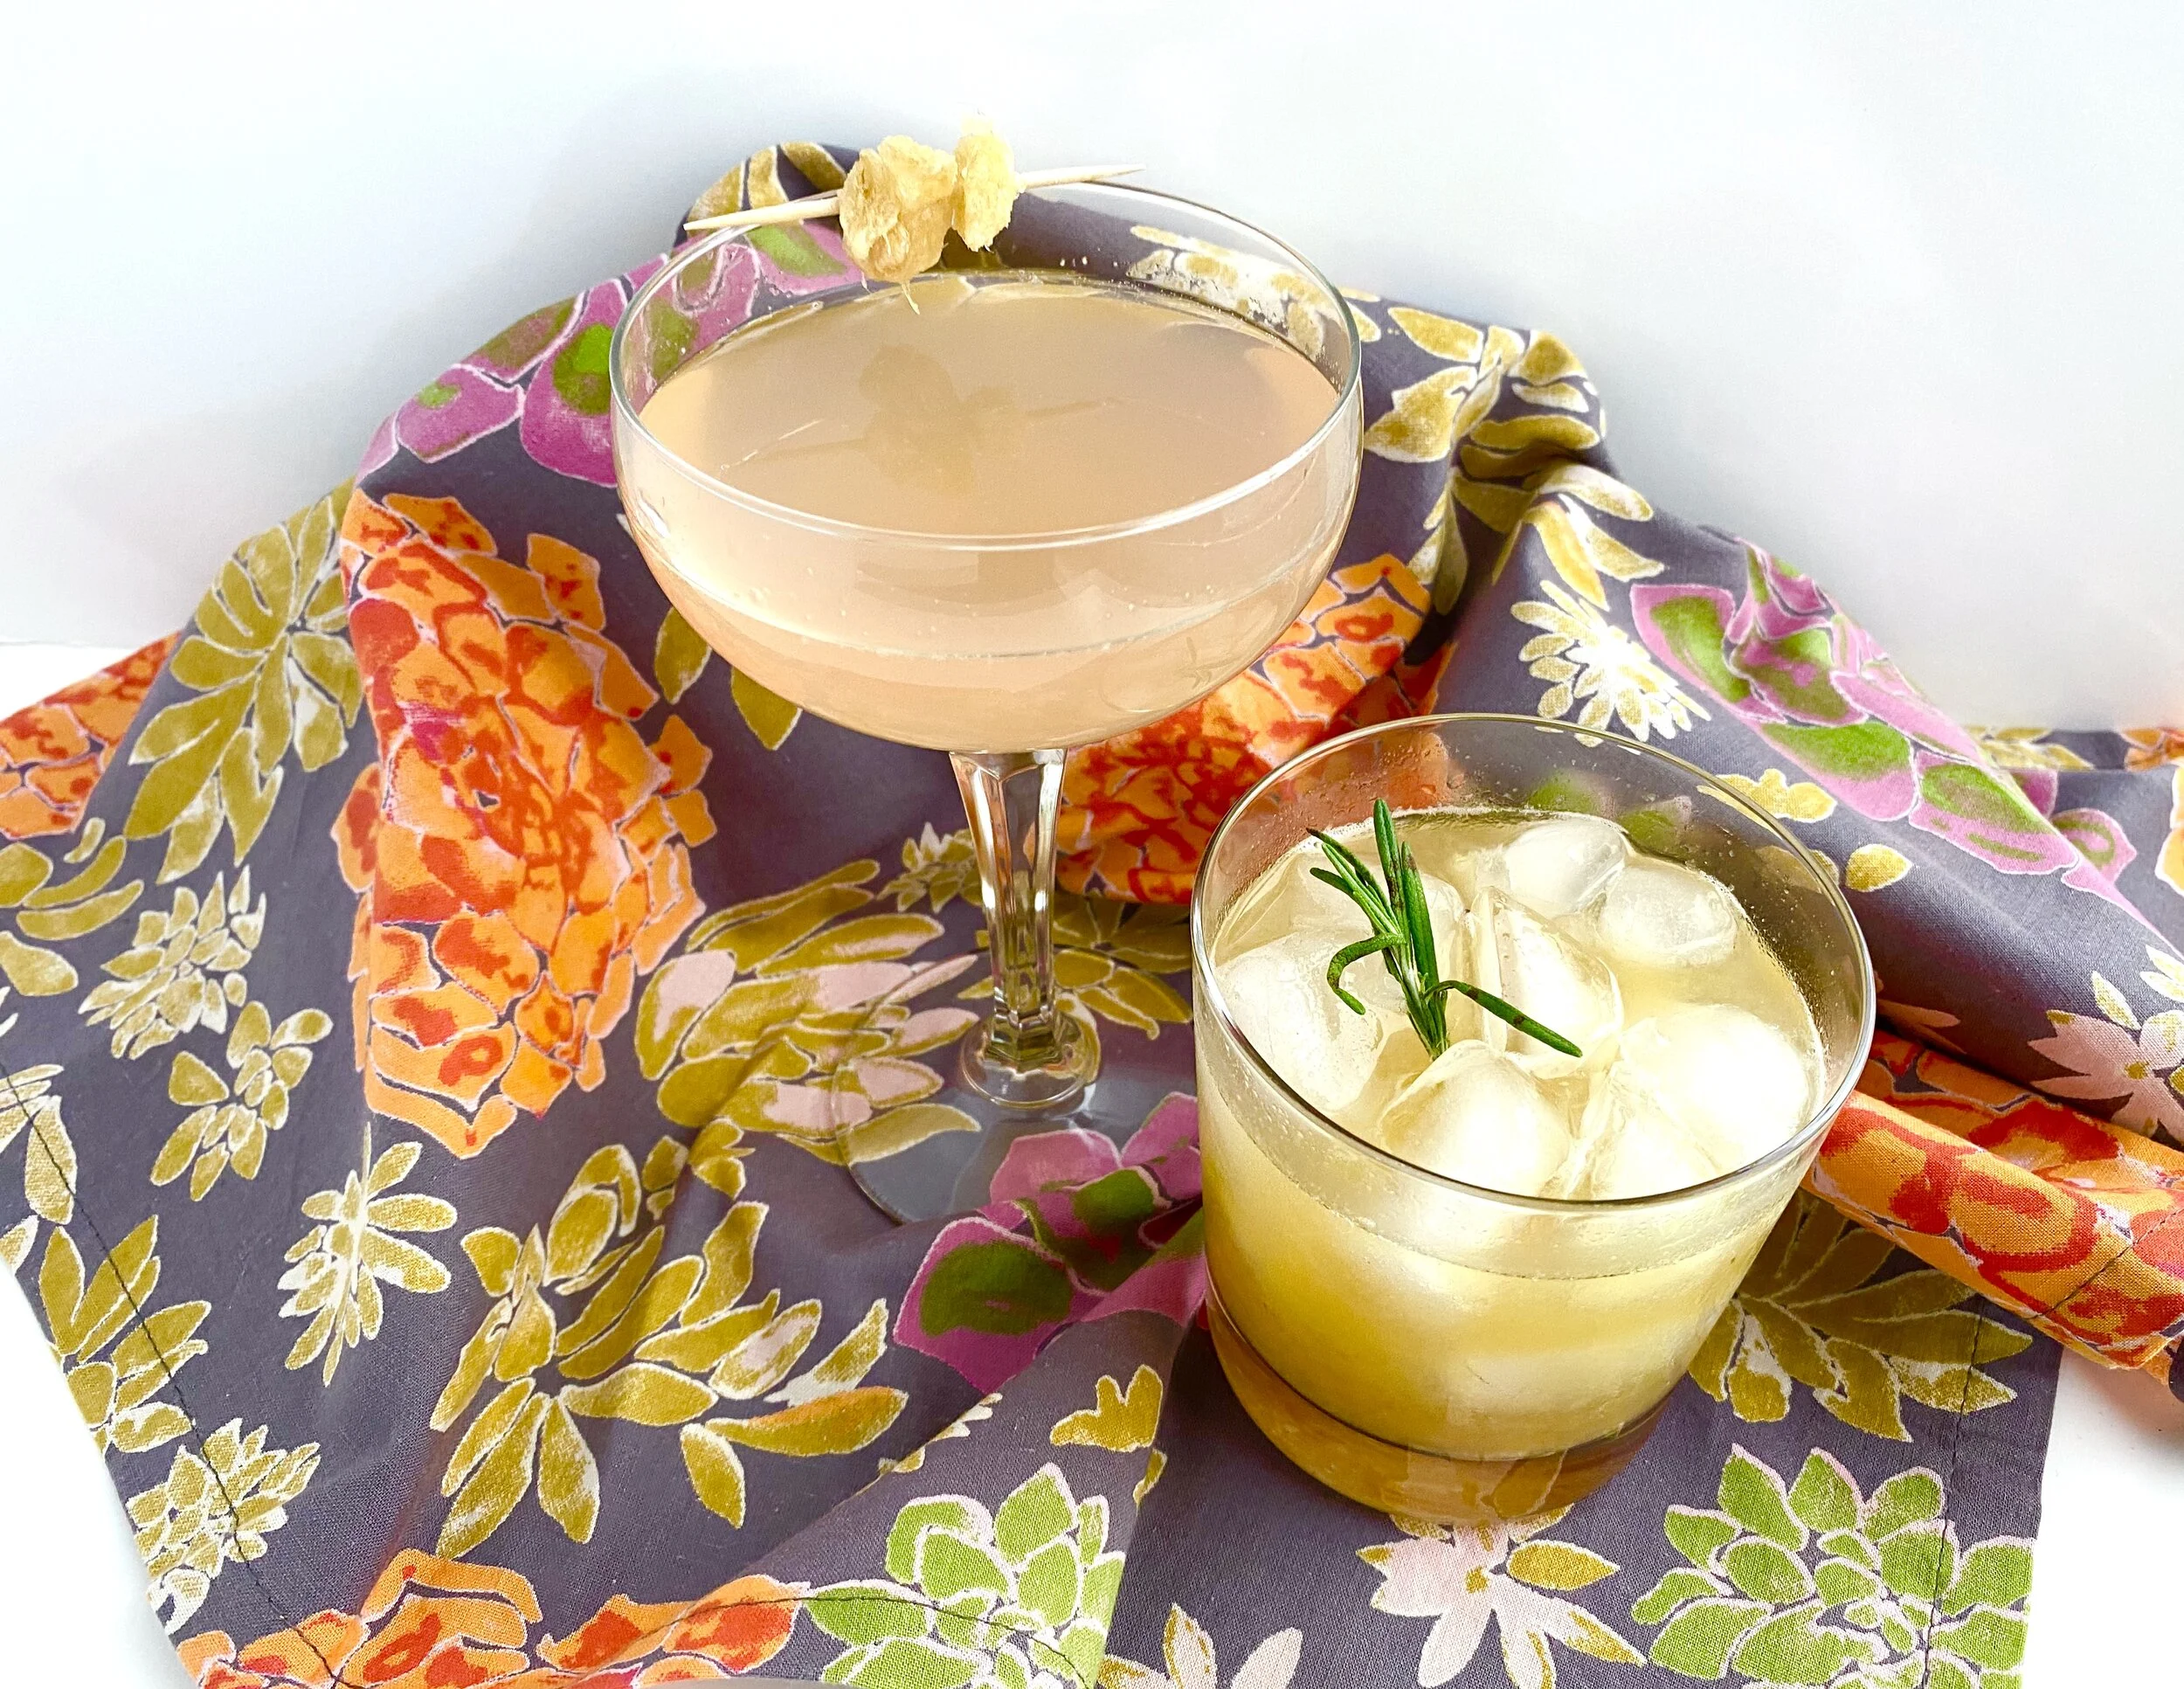
Lady Whiskey Marmalade

2 tablespoons Quince and Apple Orange and Lemon Marmalade
2 ounces whiskey
1/2 ounce lemon juice
splash of club soda
rosemary sprig to garnish

  1. In a cocktail shaker, combine marmalade, whiskey, lemon juice and ice. Shake well.

  2. Don’t strain and pour into a rocks glass. Add additional ice and top with a splash of club soda and a rosemary sprig for garnish.

Rhubarb Gin and Ginger

2 tablespoons Bushel and Peck’s Rhubarb Gin Jam
2 ounces gin
1 ounce lemon juice
splash of club soda
crystallized ginger for garnish

  1. In a cocktail shaker, combine jam, gin, lemon juice and ice and shake well.

  2. Strain into a coupe glass and add a splash of club soda. Garnish with crystallized ginger on a toothpick.


Tomato, Corn, and Black Bean Saute

Tomato+Corn+and+Black+Bean+Saute

Tomato, Corn, and Black Bean Saute
serves 4

This recipe is a quick summery meal that involves minimal chopping and a very short cook time. It’s also a pantry-friendly meal any time of the year because you can easily use frozen corn and canned black beans. Corn and black beans together actually make a complete vegetarian protein, so it’s a reason you’ll see these two often paired together culturally. Grape tomatoes are my favorite for texture and taste, but any kind of tomato would work here as long as it’s chopped smaller.

3 garlic cloves, minced
1 lb frozen corn (3 cups), fire-roasted if you can find it
1 pint grape tomatoes, halved (2 cups)
1 15-ounce can black beans, rinsed and drained (1.5 cups)
½ cup basil, finely chopped
Olive oil, salt, and pepper

  1. Heat a drizzle of olive oil in a large skillet on medium heat.  Add garlic and saute 30 seconds.

  2. Add corn, grape tomatoes, and black beans and saute until warm, about 5 minutes.

  3. Turn off heat and stir in basil.  Season with salt and pepper and serve. 

Lentil, Artichoke, and Kale Stew

lentil artichoke and kale stew recipe

Lentil, Artichoke, and Kale Stew recipe
serves 4

This soup is a pantry-friendly staple and easy to improvise with what you have on hand. I typically use French green lentils and red lentils in my kitchen, but was accidentally delivered 2 large containers of brown ones and had to find something to do with them. Turns out, my Mushroom Lentil Pate is also delicious with basic brown or green lentils, but this soup was filling, nourishing and delicious as well.

1 onion, diced
2 carrots, diced
3 celery stalks, diced
3 garlic cloves, minced
3 teaspoons dried herbs (I used 1 t each of oregano, thyme, and parsley)
1 10-ounce jar of marinated artichokes, chopped (frozen or canned OK too)
1 chopped veggie (I used zucchini)
1.5 cups brown lentils, rinsed
8 cups water
1 parmesan rind (optional but gives great flavor)
2 15-ounce cans diced tomatoes
1 bunch of greens, chopped (fresh or frozen OK; I used kale)

  1. Saute onion, carrot celery, garlic and dried herbs for a few minutes, until they are softened. Add artichoke, other veggies, lentils, and water and simmer for 30 minutes.

  2. Add diced tomatoes and simmer for 5 minutes more. Taste and season for salt. Turn off heat and stir in greens.

Korean Tacos with Kimchi Slaw

korean tacos recipe

Korean Tacos with Kimchi Slaw recipe
Serves 4

I’ve seen “Korean Tacos” on local menus for a few years now, and while they aren’t an authentic dish, I can’t help but love them. They combine pungent and refreshing korean flavors with ease-of-assembly and customization of tacos. I use Sunja brand kimchi if I’m not at a Korean grocery store, it’s tasty and vegan for those that need it. Any kind of tortilla you like could work for this—I used corn while working on this recipe, but I also love Siete Family almond flour tortillas. If you can find ready-made bao buns, those would be delicious too. The slaw is really customizable so don’t get stuck on these ingredients; I just used what was in my CSA this week. You could try napa cabbage or even a crunchy lettuce. The carrots can be bought pre-shredded and the leftovers used for lunch salads.

For Kimchi Slaw:
4 cups thinly sliced cabbage (from 1/2 head green cabbage)
1 cup shredded carrots
1 cup kimchi, roughly chopped
2 tablespoons rice vinegar
1/2 cup chopped cilantro
salt

For Tofu:
drizzle of grapeseed oil
14 ounces extra firm tofu, sliced into 1/2” strips
1/4 cup arrowroot
6 tablespoons water
2-3 tablespoons tamari or soy sauce
1 tablespoon honey
2 cloves garlic, minced

For serving:
12 taco-sized tortillas
gochujang hot sauce

  1. Make the kimchi slaw: Toss cabbage, carrots, kimchi, rice vinegar, and cilantro together. Season to taste with salt. Flavors will continue to marinate and blend as you make the rest of the tacos.

  2. Make tofu: Heat a large nonstick skillet over medium-high heat and drizzle with grapeseed oil. Toss tofu strips with arrowroot and dust off any extra. Pan-fry (in 2 batches if you need to) until all sides of tofu are light golden and slightly crispy. About 3-4 minutes. Meanwhile, combine water, tamari, honey and garlic in a small bowl. When tofu is golden, pour mixture over tofu and let it reduce until excess water is evaporated, about 1 minute. Arrowroot from the tofu will thicken the sauce into a glaze.

  3. Assemble tacos: char tortillas if desired and serve with tofu and slaw. Drizzle optional hot sauce on top if desired.

Broccoli with Cumin and Mustard Seeds

broccoli with cumin and mustard seeds

Broccoli with Cumin and Mustard Seeds
serves 2 generously

This has been one of my go-to ways to make Indian-inspired broccoli for years. For people used to Indian dishes, it gets you a lot of that flavor without tons of ingredients or long cooking. For people not used to Indian cooking, it’s a fresh, non-intimidating way to be introduced to these flavors. Black mustard seeds are easily found at an Indian grocery store, but you can also find them in the bulk section of some health food stores like Whole Foods. Whole spices add more flavor and texture and last longer in the pantry than ground spices. Whole spices can also take this high level of heat without burning, so I think they are worth keeping at home.

1 bunch broccoli, cut into florets
1 tablespoon grapeseed oil
1 teaspoon black mustard seeds
1 teaspoon cumin seeds
1/4 teaspoon red chile flake
salt to taste

  1. In a large skillet with a lid, bring 1/4 cup water up to a simmer. Add broccoli, a pinch of salt, and cover. Let broccoli steam for 30 seconds or until bright green. Remove broccoli from skillet and wipe out skillet if necessary.

  2. Heat skillet on medium high and add grapeseed oil. Add black mustard seeds, cumin seeds, and red chile flake and stir until seeds start to pop and sizzle. Add broccoli back to the pan and saute to finish cooking and incorporate spice oil. Season with salt to taste.

Blueberry Turmeric Muffins

blueberry turmeric muffins recipe

Blueberry Turmeric Muffins recipe
makes 6 muffins

These muffins are a variation on my Summer Squash Spice Muffins, an almond flour-based recipe made with minimal ingredients. Turmeric and ginger give them underlying spice and complexity, while blueberry and lemon provide a familiar flavor that’s not too sweet or tart. Because almond flour is dense and heavy, they won’t rise like traditional muffins, so don’t fill the cups too full.

dry ingredients:
1 cup, packed almond flour (this is finer than almond meal and will turn out better)
1/2 teaspoon baking soda
pinch of salt
1/2 teaspoon ground ginger
1/2 teaspoon ground turmeric

wet ingredients:
2 eggs
1/4 cup honey or maple syrup
1 tablespoon lemon juice
1 teaspoon lemon zest

mix-ins:
3/4 cup fresh blueberries

1. Preheat oven to 350.  Line a muffin tin with 6 muffin liners.

2. Combine all dry ingredients in a mixing bowl.  Whisk together with a fork.

3. Combine all wet ingredients in a different large mixing bowl.  Whisk together with a fork.  

4. Add dry ingredients to wet ingredients, folding together with a rubber spatula until just mixed.  Add in blueberries.

5. Immediately, fill muffin cups 2/3 full (you will get a lot of spread on top if you fill them fuller--this recipe won't puff up as much as traditional muffins).  Bake for 16-20 minutes, until a toothpick can be inserted and removed with nothing sticking to it.  Let cool in tin for 5 minutes then cool on rack for another 15.  

Mango Rose Mousse

mango rose mousse recipe

Mango Rose Mousse recipe
serves 2 generously

I recently learned this dairy-free mousse technique of blending frozen fruit with a single egg white to make a creamy, light mousse-like dessert. I’ve seen it done with berries and was curious if it would work with my favorite summertime fruit: mangoes. I added a splash of rosewater to give it a South Asian flair, but that is totally optional. Just don’t be tempted to add more rosewater—it’s strong stuff. This mousse is best cold and fresh so plan on chilling it and serving within a few hours of making it. It’s easy to keep all of these ingredients on hand so this would make a perfect last minute dessert for entertaining. Just remember raw egg whites are not appropriate for everyone so use pasteurized if it’s a concern or skip this recipe.

2 cups frozen mango
1/2 teaspoon rosewater (optional)
1 1/2 tablespoons honey
1 egg white

  1. In a food processor with the s-blade process mango until it’s coarsely ground. Add rosewater and honey and process until combined.

  2. Add egg white and process for 1-2 minutes until mixture color lightens and increases in volume. You’ll have a cold fluffy mousse. Serve immediately or transfer to the fridge for a couple of hours and serve cold. (Note: because of the egg white, the mousse will not hold much longer than a couple of hours and will begin to weep or deflate so plan on serving within this window.)

Thai-style Crab Fried Rice

thai crab fried rice recipe

Thai-style Crab Fried Rice recipe
serves 4

On a recent trip to NYC, I went to dinner at Fish Cheeks. Among our many great dishes, we had Thai-style crab fried rice that was light and delicate. Upon taking my first bite, I told my husband that crab fried rice was now going to be in our home dinner recipe rotation. For my version, I add a whole zucchini, finely chopped, to make this more of a one dish meal. You could easily fold in more herbs or greens at the end to do the same or use a combo of rice and cauliflower rice. To make this vegetarian, just leave out the crab and use tamari or soy sauce instead of the fish sauce. A vegan version could also omit the egg and use a couple shakes of dulse flakes to replicate the sea flavor of crab and fish sauce.

1 tablespoon grapeseed oil
4 garlic cloves, minced
1 tablespoon minced ginger
2 cups cooked jasmine rice (from about 1 cup uncooked)
1 medium zucchini, chopped into 1/4” cubes
3 teaspoons fish sauce (or tamari)
2 eggs, beaten
1 6-ounce can of crab meat (picked over for shell remnants)
1 bunch scallions, white and dark green parts thinly sliced
2 cups cilantro leaves
1 lime, cut into wedges
Sambal oelek or hot sauce for serving

  1. In a large skillet, heat oil and saute garlic and ginger for 30 seconds. In 1-2 batches (depending on the size of your pan and how dark you like your fried rice), stir fry rice for 3-5 minutes. Remove rice from pan and add zucchini, adding more oil if necessary. Saute for 2-3 minutes or until tender but still firm.

  2. Add rice back to pan and stir in fish sauce. Stir in beaten eggs until cooked. Add crab meat and scallions and stir until warm. Turn off heat and stir in cilantro. Serve with lime wedges and sambael oelek for heat.

Vegan Spinach Artichoke Dip

vegan spinach artichoke dip recipe

Vegan Spinach Artichoke Dip recipe
serves 8-10

Here I’m updating the entertaining classic of Spinach Artichoke Dip by making it vegan and more pantry-friendly. Pureed cashews make it creamy and clever recipe design means that you’ll use exactly 1 (5-ounce) bag of baby spinach and 1 (9-ounce jar) of marinated artichokes. This dip should really be served warm, so if you don’t eat all of it in one sitting, rewarm in in the oven or microwave with a splash of water or almond milk to finish up the rest.

1 ½ cups raw cashews
Drizzle of extra virgin olive oil
1 onion, smalled diced
3 cloves garlic, minced
1 ½ cups of unsweetened almond milk or coconut milk beverage
3 tablespoons lemon juice
3 tablespoons nutritional yeast
1 teaspoon kosher salt (to taste)
5 ounces baby spinach
1 cup marinated artichokes, rough chopped

  1. Preheat oven to 425.  Pour boiling water over raw cashews to soak for 10 minutes.  Drain.

  2. Heat olive oil in a large skillet and saute onions and garlic until soft and translucent, about 5-10 minutes.

  3. Add drained cashews, almond milk, lemon juice, nutritional yeast, and salt to the high powered blender and blend until smooth.  

  4. Add sauteed onions and garlic, baby spinach, and marinated artichokes and pulse until rough chopped--you still want some chunky texture.  

  5. Pour into a glass baking dish or pie plate and bake for 15-20 minutes or until hot.  Don’t cook too long or it will thicken too much and form a thick skin on top. Serve immediately with chips or crudite.  

Strawberry Balsamic Shrub

strawberryshrub1.jpg

Strawberry Balsamic Shrub recipe
Makes 2 cups

A shrub is a sweet-tart way to preserve fruit that dates back to colonial times. And it couldn’t be easier to make: simmer fruit like berries or plums with sugar and water and add vinegar. Strain and the syrup is your shrub. Shrubs are commonly found at trendy cocktail bars and are great for making at home cocktails and mocktails. I like to dilute mine with club soda to make a fizzy, sweet, and tart drink that reminds me of kombucha. The best part about shrubs is that they are perfect for ugly, imperfect or mushy fruit (just not spoiled or moldy).

1 lb strawberries, hulled and cut in half
1 cup sugar
1 cup water
1 cup vinegar (1 tablespoon balsamic vinegar and the rest apple cider vinegar)

  1. Bring strawberries, sugar, and water to a simmer.  Let simmer on low for about 20-30 minutes or until strawberries are super soft and liquid is darkly pigmented.

  2. Add vinegars and bring up to a simmer and cook for 5 minutes.  Strain through a fine mesh strainer, pushing fruit pulp with a wooden spoon to extract all liquid.  Save liquid in a mason jar and chill in the refrigerator. You can use the pulp to top ice cream, yogurt or toast.  

Teff Waffles

teff waffles recipe

Teff Waffles recipe
makes 6-8 waffles

Teff is a naturally gluten-free pseudograin, best known for being the base ingredient for the spongy Ethiopian bread injera. These tiny grains are milled whole (not refined) to make a flour that’s high in fiber and protein. I found teff flour online* but you can also look for it in the Bob’s Red Mill section of your grocery store. We don’t own a waffle iron but borrowed this one* made by All-Clad from my mother-in-law and I loved using it, so if we do end up buying one, I’ll probably go with this one. I served these with maple syrup, strawberries, and coconut yogurt. Leftover waffles can be cooled and refrigerated or frozen and then reheated in the toaster.

2 cups teff flour
2 teaspoons baking powder
pinch of sea salt
1 teaspoon ground cinnamon
1 teaspoon pumpkin pie spice
2 eggs
2 cups coconut milk beverage (the boxed kind, not canned coconut milk)
1/4 cup maple syrup
3 tablespoons coconut oil, melted

  1. Preheat waffle maker.

  2. In a large bowl, stir together teff flour, baking powder, sea salt, cinnamon, and pumpkin pie spice.

  3. In a medium bowl, whisk eggs, coconut milk beverage, maple syrup, and coconut oil.

  4. Pour liquid ingredients into dry ingredients and stir until just combined. Ladle batter into waffle iron and cook in batches according to iron instructions. I like to turn my waffle iron up to the highest setting and let the batter cook 2 extra minutes after the timer goes off because I like crispy waffles.

*affiliate links

Peach Gummies

peach gummies recipe

Peach Gummies recipe
makes about 200 gummies

I got into homemade gummy treats earlier this year when I had a doctor tell me to eat a more animal protein temporarily during a treatment I was getting. I’ve never been much of a meat eater, so I found that adding collagen and gelatin into some plant-based foods was a good way for me to get started. Now I love these little gummy treats and appreciate that I’m getting a little protein boost from them. I found these gummy bear molds on Amazon* and love them! They come with a little dropper to get the liquid neatly in the molds. For my vegetarian/vegan friends, you can make similar gummy treats using agar agar, a seaweed based gelatin—here’s a vegan recipe to try.

2 cups defrosted frozen peaches
juice from 3 lemons
2 tablespoons honey
6 tablespoons grassfed gelatin (I used Vital Proteins)

  1. In a blender, blend defrosted peaches and lemon juice until very smooth. Transfer to a small pot and whisk in honey. Turn heat on low and whisk in grassfed gelatin, making sure no lumps remain. Bring up to a low simmer and turn off heat.

  2. Transfer thickened mixture while it’s still hot to a glass baking dish or to gummy molds. If using molds you’ll want to use the dropper that comes with the set. Chill in the fridge until solidified, about 2-3 hours. Unmold and store in the fridge for about a week.

*affiliate link